


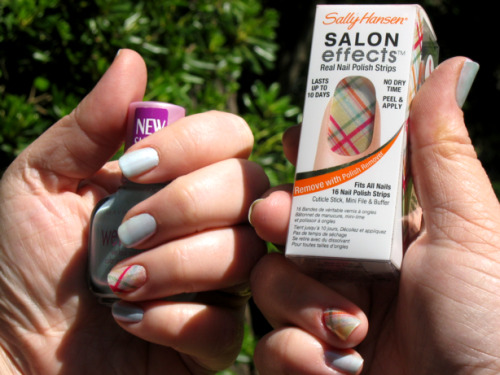
The accent nail is easy and it's so fun to play with different ideas and combinations! This week I again used Sally Hansen Salon Effects Nail Polish Strips, this time in a different pattern (and definitely not pastel like last week!).
I would also like to acknowledge that it looks like I used Photoshop to edit my ring finger in this photo, and I SWEAR I didn't! The photo just (very oddly) turned out that way!

It kinda looks like I used Photoshop to edit the polish on my ring finger in this photo, and I promise I didn't! :)

♥ Sally Hansen Insta-Dri Fast Dry Nail Color in Night Flight {buy it at Ulta}
♥ Sally Hansen Salon Effects Nail Polish Strips in "Love Letter" {buy it at Ulta}
♥ Sally Hansen No-Chip Acrylic Top Coat {buy it at Ulta}
Side note: Ulta is offering a coupon for 20% off item of your choice now through May 26! Get it, girl!
 The Sally Hansen polish strips (OPI and Butter London make them now, too, and I'm sure more brands will follow suit) are pretty easy to apply, but kind of hard to take off (I used regular polish remover but it took almost twice as long to remove the strip as it did normal polish).
I also used fake nails for this manicure! It was a nail-biting week at work and my natural nails were just too short and pathetic to work with, so I opted for Kiss artificial nails (I have this set of 100 and trimmed and filed them down to my desired length and shape). Did I fool you? Or not really? :)
I'm not sure I'd like the "love letters" on all five fingers -- seems a little much for me. I like the patterned strips much better as an accent. Yay!
More accent nail ideas using Sally Hansen strips:
I have this plaid pattern and just have yet to try it! {source}


Have you tried any accent nail ideas? Share your links! And remember to visit the other awesome Mani Monday bloggers! Thanks to Heather at Glitter and Gloss & Heather at Just Love.ly Things for hosting!


Another week of great nails! I agree, the lettering would be too much for all your nails but as an accent it is lovely.
ReplyDeleteI almost did an accent nail this week and then decided I need the accent on all my fingers :)
ReplyDeleteHere's my post:
http://collettaskitchensink.blogspot.com/2012/05/live-mani-monday-52112.html
Colletta
Ooh, I like it! You fooled me with the fake ones, they look so real! I need to keep a set around for when I break one nail. I always end up clipping them down to nubs!
ReplyDeleteI have a few sets of the strips but haven't tried them yet!
The strips are SO FUN, Amy, you must try! And I'm glad the falsies look real enough to pass!
DeleteSo adorable!
ReplyDeletehttp://www.shannonhearts.blogspot.com
I love the look! I might have to try some of those graphic nail wraps, I'm trying to get my natural nails strengthened up quite a bit to keep them from breaking so easy. Then, I might just get experimental!
ReplyDeleteTotally, Sadie -- that's why I use the fake nails. They give my natural nails a chance to grow a bit without risk of me biting them off (since I can't get to them when I have the fakes!). But removing the fake ones CAN damage the natural nail, so I just have to be careful and use lots of strengthening topcoat afterwards. The wraps are totally doable on falsies!
DeleteSo cute! The fake nails totally fooled me, although I did notice the shape was superb. I've never used fake ones before other than when they do them in the salon, were they easy to apply yourself?
ReplyDeleteSO easy, Evani -- you just have to line them on your nail (like they do in the salon) to get the best fit, and then shape them as desired (these ones were rounded to begin with and I wanted more of a square shape, so I did that myself). It's really very easy and obviously much cheaper than having it done at the salon. These ones by Kiss came with nail glue, but many of them now come pre-glued (with peel-off adhesive strips). It's a no-brainer! I love it!
DeleteI like this black and white look. Always a classic. I like the plaid one that Sally Hansen offers too. I haven't tried these yet but have been wanting to.
ReplyDeleteI love them!! I want those strips so bad :) thanks for the sweet comment!
ReplyDeleteyou have a talent. I cannot tell you how many times I have tried and failed at this lil project! envy
ReplyDeletexx-
sabrina
www.samplesize16.com
Haha thanks Sabrina! It does take a *little* finesse (and lots of clean-up with nail polish remover!).
DeleteOoh, I love, love love SH nail strips!
ReplyDeleteThanks SO much for linking up with Mani Monday!!
xo,
Heather
Very, very cute! I've never used Sally Hansen nail strips. I'm a stubborn do-it-yourself nail art person, but I've heard so many great things about them. I think I'll finally cave and try them out. They do look pretty flawless :)
ReplyDeletehorsesofares.blogspot.com